Android Multi-Builds

How to build Android projects automatically against multiple APIs
A lot of our projects involve interacting with an API, and there can be multiple versions of the API (dev, staging, live). The traditional approach is to define a constant with the API url and when you want to change which API environment you’re using you just change the constant.
The approach we now like to use involves gradle product flavours. With this approach, every time the app is built you get an apk for each of the API environments, making it easy to switch between them.
In your apps build.gradle, you first define a flavour for each API environment:
productFlavors {
 liveAPI {

 }

 stagingAPI {

 }

 devAPI {

 }
}
There are then a few things to consider.
Different package names
First, to be able to run all the API versions on the same device, they need to have different package names. This can be achieved by giving each flavour a different applicationId:
productFlavors {
 liveAPI {
 applicationId "com.example.app.live"
 }

 stagingAPI {
 applicationId "com.example.app.staging"
 }

 devAPI {
 applicationId "com.example.app.dev"
 }
}
Different app icons
Next, to be able to differentiate all the builds after they've been installed, we give them each a different app icon. This is done by creating a src folder for each flavour and defining a res folder with drawables folders:

Define java folders
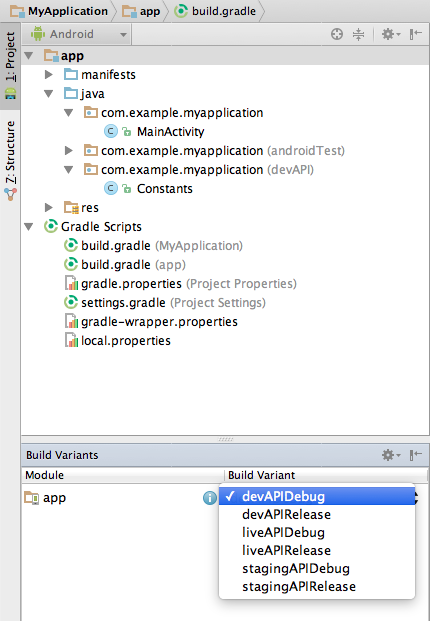
Finally, our original requirement was to have different API URLs, so within our new src folders we define java folders with the right package name sub folders and create a Constants.java file that defines the relevant URLs, and maybe authentication details:

Run 'gradlew assemble'
If you then run ‘gradlew assemble’, you'll get loads of files covering all your product flavours and build types (debug and release by default). Gradle will pull in the relevant package name, app icon and Constants.java file for each flavour. You may prefer running ‘gradlew assembleDebug’ if you want to speed up the build process and you only need the debug build.
When running the app within Android Studio, you can control which flavour is used on the Build Variants window:

Rename the output files
Another aspect we find helpful (though not specifically related to multi builds) is renaming the output files to include the build version. This is particularly helpful when you're distributing the files to your client.
The following config can be placed alongside your productFlavours and buildTypes:
applicationVariants.all { variant ->
 if (variant.zipAlign) {
 def file = variant.outputFile
 variant.outputFile = new File(file.parent, file.name.replace(".apk", "-" + defaultConfig.versionCode + ".apk"))
 }

 def file = variant.packageApplication.outputFile
 variant.packageApplication.outputFile = new File(file.parent, file.name.replace(".apk", "-" + defaultConfig.versionCode + ".apk"))
}
This should cause all files to have “-versionCode” added to the end of the file name.
Hopefully, this should be of help to you.
Looking for something else?
Search over 450 blog posts from our team
Want to hear more?
Subscribe to our monthly digest of blogs to stay in the loop and come with us on our journey to make things better!
