


How to Use Braintree Dropin UI to Avoid Building Your Own Payment Integrations

How can you customise the Braintree dropin UI in React Native?
React Native is a solid, tangible solution to develop a mobile application at speed, as 90-95% of the code will be shared across iOS and Android. In our experience at Brightec, we generally recommend fully native app development. But for some projects, it is appropriate to use a cross-platform solution. Here we discussed the pros and cons of using React Native for cross-platform development.
In a recent React Native app development project, Virgin Trains Ticketing, we decided to use the Braintree drop-in UI integration to handle payments as an easy win when you’re using Braintree. This is a great library provided by braintree (and then ported by wgltony to React Native) to save app developers the need to build their own payment integrations. It’s easy to set up and get working for React Native by following the steps on the wgltony’s github repo.
The downside of using the Braintree drop-in UI integration on React Native is that it’s potentially harder to customise the UI of it. You have to delve into the native code in order to do so.
Discover our projects, many of which handle online payments.
Customising Braintree drop-in UI in React Native for Android
To customise the look of the Android Braintree drop-in UI you have to overwrite the styles that braintree have defined in your own styles.xml. Here is the list of styles you can overwrite for Android.
How to Overwrite Styles
Copy the style into your styles.xml. This can be found in the android/app/src/res/values directory. If it’s not there then you’ll have to create one following this guide. For example if you’d like to add a bit of your app’s style to the add card activity you can do that in the following way:
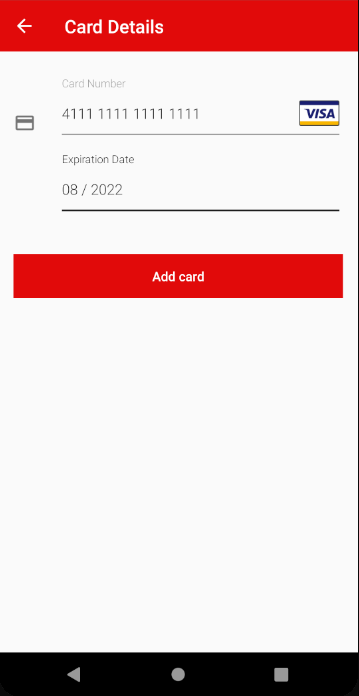
Our mobile app’s style was a red app bar with a white title and the button’s text not all in caps. However, to recolour buttons you have to overwrite the colour that braintree has defined. In your android/app/src/res/values/colors.xml include the following:
You can read more about this in the issues of the braintree Android github.
That code produces this layout:
Can You Customise Braintree Drop-in UI in React Native for iOS?
The documentation surrounding how to customise the iOS braintree drop-in UI is more complete than that of Android but it’s still worth running through. You can use Braintree dropin UI to customise a number of properties on iOS apps including:
The text color
The overlay background colour
The navigation text colour
The form’s background colour
The navigation bar’s background colour
The list is also useful for consideration when looking at the accessibility of your app.
You can find a list of different properties which you can edit in iOS.hese properties can be before initialising the braintree UI. The following code snippet would give a similar look to the Android version above:
Summary of Using Braintree Drop-in UI
All in all the braintree drop-in UI is an easy tool to use to handle payments in app development projects. Customising it is fairly straightforward but requires some native knowledge when customising it on react-native.
Click here to read more about our mobile app development best practices.
Looking for something else?
Search over 450 blog posts from our team
Want to hear more?
Subscribe to our monthly digest of blogs to stay in the loop and come with us on our journey to make things better!
