


Simple multi pane in Android - Pt 1

Multi-pane (split) layouts
A good way to utilise the space on tablet devices is to use multi-pane (split) layouts to present different parts of the app on one screen. iOS does this out-of-the-box using a split view controller. However Android does not support this out-of-the-box. This blog post illustrates one way to achieve this.
The Problem
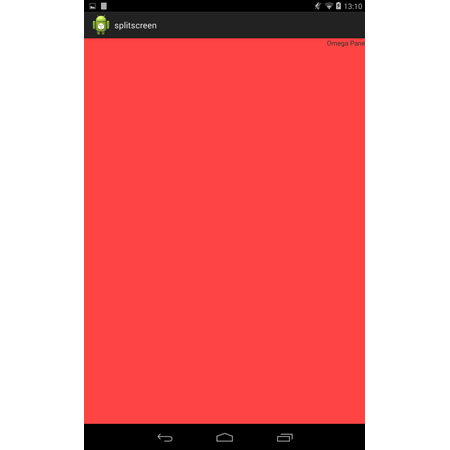
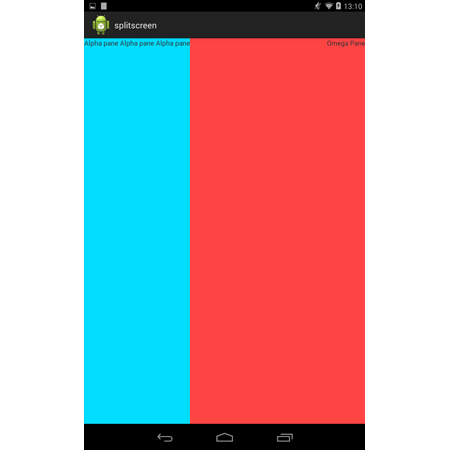
These images demonstrate what we’re trying to achieve - please excuse the horrendous colours; In Landscape mode we want two panes sitting next to each other to utilise the width of the device. In portrait mode, the width is greatly reduced so we want a way to choose which pane takes up the most area at one time by hiding/showing the left hand pane.
Landscape mode with pane's side by side:

Portrait mode with one pane hidden:
Portrait mode with one pane on top of the other:
Overview
As an overview, we’ll approach the problem as follows:
- Create an Activity which inflates two Fragments - one in the left side of the screen (which we’ll call Alpha) and one on the right (Omega).
- In portrait mode we’ll initially hide the Alpha pane.
- Then we’ll create and apply a custom touch listener which will detect left/right swipes in order to simulate the behaviour of the iOS split view controller.
The behaviour should be:
- Show the Alpha pane when the Omega pane is swiped right.
- Hide the Alpha pane when we touch the Omega pane.
- Hide the Alpha pane when we swipe the Omega pane left.
Create and inflate layouts
Under the res/layout folder there should be a layout called activity_main.xml - if not, add one. Add the following XML:
<?xml version="1.0" encoding="utf-8"?>
<RelativeLayout xmlns:android="http://schemas.android.com/apk/res/android"
 xmlns:tools="http://schemas.android.com/tools"
 android:id="@+id/RelativeLayout1"
 android:layout_width="match_parent"
 android:layout_height="match_parent"
 android:baselineAligned="false"
 android:orientation="horizontal"
 android:animateLayoutChanges="true"
 tools:context=".MainActivity" >

 <fragment
 android:id="@+id/omega"
 android:layout_width="match_parent"
 android:layout_height="match_parent"
 android:layout_alignParentLeft="true"
 android:layout_alignParentTop="true"
 class="com.example.splitscreen.OmegaFragment" />

 <fragment
 android:id="@+id/alpha"
 android:layout_width="wrap_content"
 android:layout_height="match_parent"
 android:layout_alignParentLeft="true"
 android:layout_alignParentTop="true"
 class="com.example.splitscreen.AlphaFragment" />

</RelativeLayout>
This is the container for two panes and will be the initial Activity we launch the app into.
We’ve used a relativeLayout with both its subview pinning to the top/left of the view. This is because we want the views to overlay each other.
However in landscape mode, we want the panes to subviews to sit next to each other as the pane hiding is not necessary in this mode. To do this we’ll create another layout which uses a linearLayout.
Handling landscape
Under the res folder create a new folder called layout-land. In this folder create a new layout called activity_main.xml and paste the following XML in:
<LinearLayout xmlns:android="http://schemas.android.com/apk/res/android"
 xmlns:tools="http://schemas.android.com/tools"
 android:id="@+id/LinearLayout1"
 android:layout_width="match_parent"
 android:layout_height="match_parent"
 android:animateLayoutChanges="true"
 android:baselineAligned="false"
 android:orientation="horizontal"
 tools:context=".MainActivity" >


 <fragment
 android:id="@+id/alpha"
 android:layout_width="wrap_content"
 android:layout_height="match_parent"
 class="com.example.splitscreen.AlphaFragment" />


 <fragment
 android:id="@+id/omega"
 android:layout_width="0dp"
 android:layout_height="match_parent"
 android:layout_weight="1"
 class="com.example.splitscreen.OmegaFragment" />

</LinearLayout>
This folder structure is Android’s way of allowing us to display different layouts easily, depending on the orientation. Here we’re not pinning the subviews to the edges, but rather laying them out side-by-side as is the nature of a horizontal LinearLayout.
Fragments
Most of this looks like a normal layout but instead of defining typical views (i.e. RelativeLayout, Linearlayout, textView) we define Fragments which define their own layouts.
Fragments gives us the freedom to reuse layouts and code in different activities if we choose. (It becomes particularly useful when showing two different screens from a phone version on one screen of a tablet - which would be a typical use case in this scenario).
Whilst we’re here we might as well create our pane’s layout and content so go ahead and create two more layouts: fragment_alpha.xml & fragment_omega.xml Add the following code to fragment_alpha.xml:
<?xml version="1.0" encoding="utf-8"?>
<LinearLayout xmlns:android="http://schemas.android.com/apk/res/android"
 android:layout_width="match_parent"
 android:layout_height="match_parent"
 android:background="@android:color/holo_blue_bright"
 android:orientation="vertical" >

 <TextView
 android:layout_width="wrap_content"
 android:layout_height="wrap_content"
 android:text="Alpha pane Alpha pane Alpha pane" />
</LinearLayout>
And add the following code to fragment_omega.xml:
 <?xml version="1.0" encoding="utf-8"?>
 <LinearLayout xmlns:android="http://schemas.android.com/apk/res/android"
 android:layout_width="match_parent"
 android:layout_height="match_parent"
 android:background="@android:color/holo_red_light"
 android:gravity="right"
 android:orientation="vertical" >

 <TextView
 android:layout_width="wrap_content"
 android:layout_height="wrap_content"
 android:text="Omega Pane" />
 </LinearLayout>
These are standard and familiar layouts.
Anything you wish to display in these panes should go here. For now I’ve just added some colour and textViews. In the activity_main.xml layout you might have noticed our fragments are referencing two classes which do not exist yet: class="com.example.splitscreen.OmegaFragment" & class="com.example.splitscreen.AlphaFragment".
In the src/ folder create two new classes: OmegaFragment and AlphaFragment. Paste the following code into AlphaFragment.java which simple handles the inflating of our fragments:
public class AlphaFragment extends Fragment {

 @Override
 public View onCreateView(LayoutInflater inflater, ViewGroup container, Bundle savedInstanceState) {
 View view = inflater.inflate(R.layout.fragment_alpha, container, false);
 return view;
 }
}
Paste the following code into OmegaFragment.java which does the same:
public class OmegaFragment extends Fragment {

 @Override
 public View onCreateView(LayoutInflater inflater, ViewGroup container, Bundle savedInstanceState) {
 View view = inflater.inflate(R.layout.fragment_omega, container, false);
 return view;
 }
}
Finally inflate your activity in the usual.
Now we’re ready to put it all together and get it working in. Check out part 2 of simple multi pane in Android here.
Related articles
This article was originally written for Brightec by Andy Hails
Looking for something else?
Search over 450 blog posts from our team
Want to hear more?
Subscribe to our monthly digest of blogs to stay in the loop and come with us on our journey to make things better!
