


UICollectionView Tutorial: How to Create Sticky Headers with Horizontal and Vertical Scrolling

One of the realities of working in app development is overcoming the challenges that come our way.
Not that we’re complaining, far from it. We relish each new obstacle (unless it’s how to get our change out of the vending machine). It’s what makes us tick.
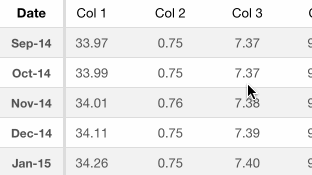
One of our most recent challenges was a tableview which could be scrolled both horizontally and vertically.The view required a static header, similar to what you’d be used to seeing in a spreadsheet.
Finally, we needed this tableview to contain a large amount of data, so it was crucial it scrolled smoothly.
The result would look something like this:
Building a UICollectionView: The Challenges
Firstly, let’s recap on some of the challenges - sometimes in development the first step is just to clarify what the problems actually are (not a bad life tip in general):
To create a table view with horizontal and vertical scrolling.
To create a UICollectionView with sticky headers in both the horizontal rows and vertical columns.
With a large amount of data, scrolling must remain smooth.
Read on to discover how we overcame these challenges and built a tableview with static headers and horizontal and vertical scrolling that worked smoothly.
How We Built a UICollectionView with Horizontal and Vertical Scrolling and Sticky Rows and Columns
We started thinking on a UITableView inside an UIScrollView, but after some attempts we realised it was tricky task customising it in terms of scrolling and sticking cells.
It was really painful to work with the UITableView to make the necessary customisation. So, we decided to change to UICollectionView, which is much more customisable.
Second try - UICollectionView
The UICollectionView offers greater customisation, allowing you to set a custom UICollectionFlowLayout. Unfortunately, the grid layout scrolls along one axis only; either horizontally or vertically.
We hoped we could embed the collection inside a UIScrollView, allowing us to scroll in both directions, but after some attempts we decided to subclass the UICollectionFlowLayout superclass: UICollectionViewLayout.
Subclassing UICollectionViewLayout
The definitive solution was to subclass the UICollectionViewLayout class, which allowed the required customisation we needed.
Here are the steps we followed to create the collection view:
1. Create a subclass of UICollectionViewLayout.
2. Place a UICollectionView in our desirable nib file. We can also create it programmatically, so it’s up to you.
3. Set some properties in the Attributes Inspector. We set the Layout to ‘Custom’ and set our class name in the ‘Class’ textfield that appears below. Tick on ‘Scrolling Enabled’ and if you want to scroll only in one direction each time tick on ‘Direction Lock Enabled’. Otherwise, you could scroll in both directions at the same time.

4. Finally, open the Connections Inspector and connect the UICollectionView referencing outlet to your UIViewController. Don’t forget to connect the dataSource and delegate too!
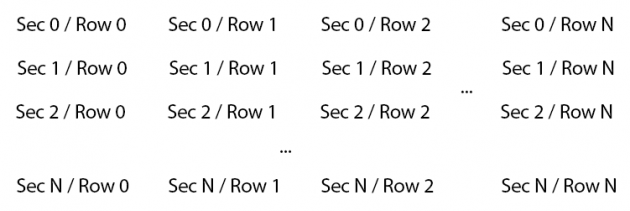
5. In our collection view the sections are denoted as row and the rows as columns, so keep this in mind to set the number of sections and items. It depends on the collection view flow layout direction we set.
According to Apple docs: “The items in the collection view flow from one row or column (depending on the scrolling direction) to the next, with each row comprising as many cells as will fit”
6. Once you finished to set the collection view methods, we need to set the custom collection view layout we created. Firstly, we need to set three properties to manage all the data:
@property (strong, nonatomic) NSMutableArray *itemAttributes;
@property (strong, nonatomic) NSMutableArray *itemsSize;
@property (nonatomic, assign) CGSize contentSize;
7. If you want to set custom sizes for the items, you need to set the following method:
- (CGSize)sizeForItemWithColumnIndex:(NSUInteger)columnIndex;
I highly recommend you store the calculated sizes on itemsSize array in order to do the calculations only once per column. Otherwise it could slow the performance!
8. Write the following method and set the response to YES in order to call ‘prepareLayout’ every time you scroll. You need this to stick the headers!
- (BOOL)shouldInvalidateLayoutForBoundsChange:(CGRect)newBounds
{
 return YES; // Set this to YES to call prepareLayout on every scroll
}
9. You need to layout the visible items by calling this method:
- (NSArray *)layoutAttributesForElementsInRect:(CGRect)rect
{
 NSMutableArray *attributes = [@[] mutableCopy];
 for (NSArray *section in self.itemAttributes) {
 [attributes addObjectsFromArray:[section filteredArrayUsingPredicate:[NSPredicate predicateWithBlock:^BOOL(UICollectionViewLayoutAttributes *evaluatedObject, NSDictionary *bindings) {
 return CGRectIntersectsRect(rect, [evaluatedObject frame]);
 }]]];
 }

 return attributes;
}
According to Apple docs: “Returns the layout attributes for all of the cells and views in the specified rectangle. Subclasses must override this method and use it to return layout information for all items whose view intersects the specified rectangle. Your implementation should return attributes for all visual elements, including cells, supplementary views, and decoration views.”
10. You need to return the layout attributes for a given indexpath, so return the corresponding item attributes with this method:
- (UICollectionViewLayoutAttributes *)layoutAttributesForItemAtIndexPath:(NSIndexPath *)indexPath
{
 return self.itemAttributes[indexPath.section][indexPath.row];
}
11. You also need to return the contentSize when the view layout requires it:
- (CGSize)collectionViewContentSize
{
 return self.contentSize;
}
12. Finally, we need to set the ‘prepareLayout’ method. This will be called every time we need to redraw the collection view. Let’s comment on this method through the following steps.
- (void)prepareLayout;
13. Firstly, we ensure we have the required data to be shown, otherwise we return void:
if ([self.collectionView numberOfSections] == 0) {
 return;
}
14. Now we must check if we'e calculated the item's attributes. In affirmative case, we are going to use these attributes to stick the headers (step 15). Otherwise we need to calculate the attributes for the first time and save them in the itemAttributes array.
Basically what we do is to calculate the item's sizes, to loop through all items and to calculate the item size, frame and the zIndex property to keep them visible. Finally, we calculate the contentSize for the last item in order to calculate the total height of the content:
// The following code is only executed the first time we prepare the layout
self.itemAttributes = [@[] mutableCopy];
self.itemsSize = [@[] mutableCopy];

// Tip: If we don't know the number of columns we can call the following method and use the NSUInteger object instead of the NUMBEROFCOLUMNS macro
// NSUInteger numberOfItems = [self.collectionView numberOfItemsInSection:section];

// We calculate the item size of each column
if (self.itemsSize.count != NUMBEROFCOLUMNS) {
 [self calculateItemsSize];
}

// We loop through all items
for (int section = 0; section < [self.collectionView numberOfSections]; section++) {
 NSMutableArray *sectionAttributes = [@[] mutableCopy];
 for (NSUInteger index = 0; index < NUMBEROFCOLUMNS; index++) {
 CGSize itemSize = [self.itemsSize[index] CGSizeValue];

 // We create the UICollectionViewLayoutAttributes object for each item and add it to our array.
 // We will use this later in layoutAttributesForItemAtIndexPath:
 NSIndexPath *indexPath = [NSIndexPath indexPathForItem:index inSection:section];
 UICollectionViewLayoutAttributes *attributes = [UICollectionViewLayoutAttributes layoutAttributesForCellWithIndexPath:indexPath];
 attributes.frame = CGRectIntegral(CGRectMake(xOffset, yOffset, itemSize.width, itemSize.height));

 if (section == 0 && index == 0) {
 attributes.zIndex = 1024; // Set this value for the first item (Sec0Row0) in order to make it visible over first column and first row
 } else if (section == 0 || index == 0) {
 attributes.zIndex = 1023; // Set this value for the first row or section in order to set visible over the rest of the items
 }
 if (section == 0) {
 CGRect frame = attributes.frame;
 frame.origin.y = self.collectionView.contentOffset.y;
 attributes.frame = frame; // Stick to the top
 }
 if (index == 0) {
 CGRect frame = attributes.frame;
 frame.origin.x = self.collectionView.contentOffset.x;
 attributes.frame = frame; // Stick to the left
 }

 [sectionAttributes addObject:attributes];

 xOffset = xOffset+itemSize.width;
 column++;

 // Create a new row if this was the last column
 if (column == NUMBEROFCOLUMNS) {
 if (xOffset > contentWidth) {
 contentWidth = xOffset;
 }

 // Reset values
 column = 0;
 xOffset = 0;
 yOffset += itemSize.height;
 }
 }
 [self.itemAttributes addObject:sectionAttributes];
}

// Get the last item to calculate the total height of the content
UICollectionViewLayoutAttributes *attributes = [ [self.itemAttributes lastObject] lastObject];
contentHeight = attributes.frame.origin.y+attributes.frame.size.height;
self.contentSize = CGSizeMake(contentWidth, contentHeight);
NOTE: You may wonder why we set those ‘1024’ and ‘1023’ values. Well, these values are not significant, just keep in mind to set one greater that the other and both greater that zero. If you set the same value for these two zIndex, you are not preventing the first item from sticking.
15. In case we have calculated the items attributes before, we only need to stick the headers by setting the frame with the y-offset for the first row (when we scroll vertically) and with the x-offset for the first columns (when horizontally):
// Next times, the first time self.itemAttributes is equal to zero
if (self.itemAttributes.count > 0) {
 for (int section = 0; section < [self.collectionView numberOfSections]; section++) {
 NSUInteger numberOfItems = [self.collectionView numberOfItemsInSection:section];
 for (NSUInteger index = 0; index < numberOfItems; index++) {
 if (section != 0 && index != 0) {
 continue;
 }

 UICollectionViewLayoutAttributes *attributes = [self layoutAttributesForItemAtIndexPath:[NSIndexPath indexPathForItem:index inSection:section]];
 if (section == 0) {
 CGRect frame = attributes.frame;
 frame.origin.y = self.collectionView.contentOffset.y;
 attributes.frame = frame;

 }
 if (index == 0) {
 CGRect frame = attributes.frame;
 frame.origin.x = self.collectionView.contentOffset.x;
 attributes.frame = frame;
 }
 }
 }

 return;
}
Final Words
This step-by-step guide should help you to create your own collectionview layout, including the sticky headers and the vertical and horizontal scrolling. We hope it’s helpful!
For more how-to articles like this one, browse our blog.
This article was originally written for Brightec by Jose Martinez
Looking for something else?
Search over 450 blog posts from our team
Want to hear more?
Subscribe to our monthly digest of blogs to stay in the loop and come with us on our journey to make things better!
